Now that we have moved our database from our Docker stack to Amazon, we’re going to let Amazon handle our SSL certificates instead of Caddy. Our domain name will point to an Elastic Load Balancer which will have our SSL certificate, and the Elastic Load Balancer will point to our Docker machines running Nginx + Gunicorn. This along with our database change will allow our application to scale easier and have almost no downtime when deploying updates. We can increment the number of EC2 instances running our application with no issues regarding SSL and the database, and we can either do Rolling Deployments by updating each of the instances, or Blue Green Deployments by changing our ELB’s target groups.
We’re going to create two new files: compose/production/nginx/Dockerfile and compose/production/nginx/sites-enabled/oursite.conf. We will also need to modify production.yml. We can also remove Caddy related files later.
compose/production/nginx/Dockerfile
FROM tutum/nginx
RUN rm /etc/nginx/sites-enabled/default
COPY ./compose/production/nginx/sites-enabled/oursite.conf /etc/nginx/sites-enabled/default
This is pretty straightforward, we’ll use the tutum/nginx Docker image, delete the default site, and copy our configuration as the default one.
compose/production/nginx/sites-enabled/oursite.conf
server {

    set $my_host $host;
    if ($host ~ "\d+\.\d+\.\d+\.\d+") {
        set $my_host "oursite.com";
    }

    listen 80;
    server_name oursite.com;
    charset utf-8;
    error_log /dev/stdout info;
    access_log /dev/stdout;

    location / {
        proxy_pass http://django:5000;
        proxy_set_header Host $my_host;
        proxy_set_header X-Real-IP $remote_addr;
        proxy_set_header X-Forwarded-For $proxy_add_x_forwarded_for;
    }

    if ($http_x_forwarded_proto != 'https') {
      return 301 https://$my_host$request_uri;
    }
}
The first lines are in case someone tries to access our host via IP instead of our domain name. Now we won’t need to dynamically set the IP address for ALLOWED_HOSTS. I had to set this because Amazon would periodically run health checks against our machines, using the internal IPs, and this kept raising errors on Sentry. So instead of grabbing our internal hostname/IP and add them to ALLOWED_HOSTS dynamically, I set the host variable to our domain name if someone tries to access via IP.
production.yml
  nginx:
    build:
      context: .
      dockerfile: ./compose/production/nginx/Dockerfile
    env_file: .env
    ports:
      - "0.0.0.0:80:80"
    depends_on:
      - django
This is how our nginx service should look like. We need to also remove the caddy service from the services.
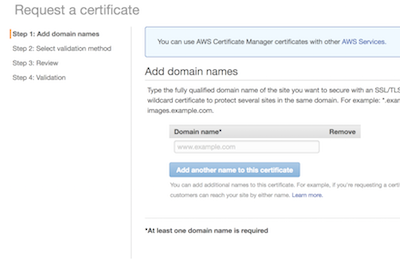
On the Amazon end, I registered my domain with Route 53 and requested a certificate via ACM, Amazon Certificate Manager.
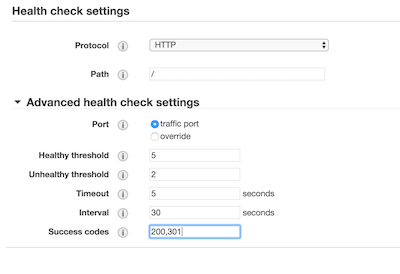
Next, I created two Target Groups. One is enough for this tutorial, but I wanted two so I could implement a Blue Green Deployment. Make sure you add 301 as a success code, as Nginx will redirect HTTP to HTTPS with a 301.
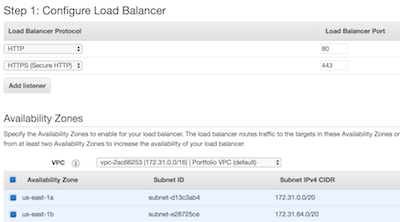
Now we can set up our Elastic Load Balancer. We want an Application Load Balancer with two listeners, the default port 80 listener and a port 443 listener.
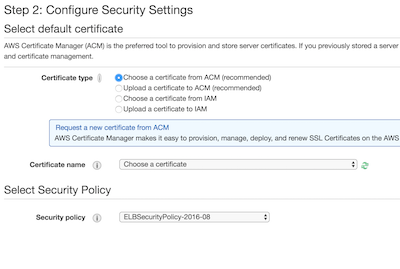
On the port 443 listener, we can set up the SSL certificates we need for our domain. We’re going to select a certificate from ACM, the one we previously requested.
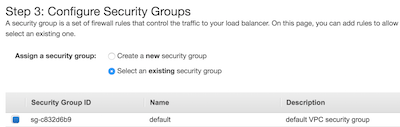
On Step 3, I selected the default security group that was created for our VPC.
Now on Step 4, we’re going to select one of the target groups we created earlier.

Finally, our Route 53 hosted zone should have an A record for our domain and it should be checked as an alias. From the alias target list, we have to select our newly created ELB.
The next article will be a short one, some small bash scripts to deploy updates with almost no downtime. In the future, we’ll also look into an ELK stack to handle centralized logging for our infrastructure.